3.2 Changing Due Dates and Availability
Changing due dates and activity availability requires just a few minutes of effort. Let's start by looking at an activity in your course that has no due date. Access your course and locate an activity with no due date assigned.
|
|
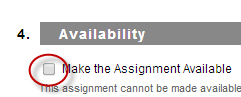
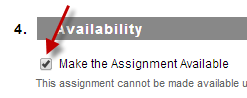
Follow the same rules for editing an item, and left-click on the double drop-down errors to edit the activity. Notice under section 4: Availability there are four little sections. The first determines if the activity is available for your students to access. Naturally, you want them to see the activity, so go ahead and check the little box.
|
|
Next, look below the Number of Attempts section to Limit Availability. This section means you can set an item or activity to be invisible to your students until a specific date or time, and then students can see it. Additionally, you can set the item or activity to become invisible again after a specific date any time. Left-clicking the little check box next to Display after: and Display until: activates those two options. However, notice how they are separated. You do not have to set both, so you can allow students to view items and activities from the beginning of the course until the due date and then have the item or activity vanish.
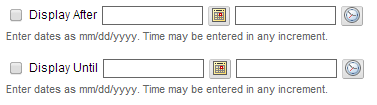
You can enter a numerical date value into the first blank rectangle if you know the date (##/##/####), or you can left-click on the small calendar icon. This allows you to navigate to a date and simply click which day of a month you wish the activity to be due.

|

|
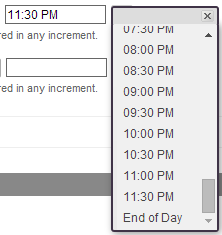
The next two items have the same setup as the date items. There is a rectangular box with a small clock icon next to the box. A time can be manually input, or you can choose a default by left-clicking the small clock icon. Scroll down the list until you have found an appropriate time and click it.

|
|
|
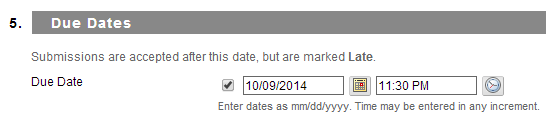
As for setting due dates, locate section 5: Due Dates. The first item is a check box. Left-clicking this check box tells Blackboard that you want the due date to apply to the activity. Next, you need to set a specific date. Modifying the Due Date is performed with the same tools explained above with the calendar and clock icons.
|
|

With a date in place, select a time by following the same instructions as mentioned for changing the Display After: and Display Until: sections.
That is all there is to setting a due date. Now, in the case that a due date needs changing, you access an activity normally and locate the same section, 5: Due Dates. Simply change the information already in place by following the above steps.
Next Step
When you are ready, move on to Section 3.3 Chapter 3 Activities.
