9.2 Creating Discussions in Blackboard
Discussions are the most basic best practice for ensuring student-to-student interaction in an online course. Not all courses include major interactive components such as group projects, blogs, wikis, collaboration or presentation opportunities. However, every online course should contain frequent discussion opportunities where students can interact with one another and develop their own ideas about the course content. It is this level of interaction which promotes academic growth; the very reason for taking classes to begin with.
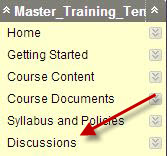
To create a Discussion Thread, you must go to the Discussions Forum by left-clicking Discussions on your Course Menu.
To create a Discussion Thread, you must go to the Discussions Forum by left-clicking Discussions on your Course Menu.
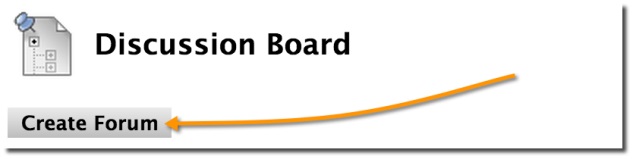
The Discussion Forum page is where students view all of the discussions in a course. Discussions can be moved up and down after they are created, so they are organized in a format following the course design. To create a Discussion Thread locate and left-click the Create Forum button.
|
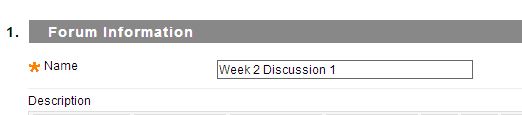
The Create Forum page includes all of the tools necessary to create and format a Discussion Thread. First, the thread needs a name. Locate and select the Name text field and enter a name appropriate for the Discussion Thread. For example; Week 2 Discussion 1.
|
|

With a proper title, it is time for a discussion topic. Think about something related to the course that aligns with the weekly material and would allow students to gain more understanding of an important subject. Enter the discussion question with specific expectations into the Description text field.

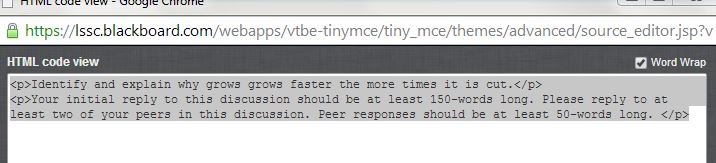
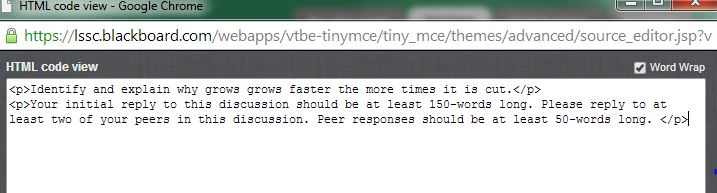
Creating the Discussion Thread is half of the process, so locate and left-click on the HTML tool button located on the tools bare. It is on the right side, sort of sticking out.

Highlight and copy the HTML code from the pop up screen. Paste the code into Notepad. This is a free software that typically comes installed on most computers. You will need this soon, so don't close the file. Go ahead and close the HTML window after you have copied the code into Notepad.
|

|
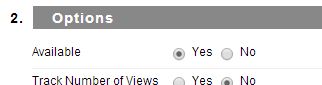
Ensuring the Discussion Thread is available is an important step. Typically, the default setting has a new thread set to Yes next to Availability. Scroll down the page a bit and make sure. If the thread is not set to available, students will not see the thread after it is created.

Like assessments and activities, Discussion Threads can carry a grade in a course. In fact, graded discussions are strongly recommended as students will not likely participant if there is no penalty to their overall grade. Scroll down a little further to Grade under section 3. Forum Settings. Make sure the small circle is selected next too Grade Discussion Forum: Points Possible.

Assign some points to the Discussion Thread. Do not make the discussion worth too much, but sufficient for students to take the discussion seriously.

Next, make sure that the check box next too show participants in "needs grading" status after every # posts is not checked. This determines whether or not, or how often, you receive notifications after students post responses to the Discussion Threads. Consider having 25 students per course, and you are teaching five courses. Now imagine that after each of those students posts to the Discussion Threads, there is a ding. Turning this function off is highly recommended.

Typically, the last step during the process of creating a thread involves associating or creating a Grading Rubric. However, this is covered later in this book (see Chapter 11). Go ahead and scroll down to the bottom of the page and click the Submit button.

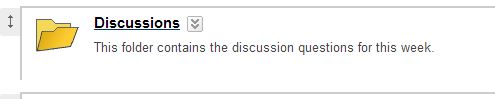
Congratulations! You have created a Discussion Thread. But wait, there is the HTML code you copied that still needs addressing. When creating discussions, best practices show that linking them directly into the weekly content areas supports student success. This is why the weekly folders include a Discussions folder. Go ahead and locate the week in which the Discussion Thread you just created belongs. Enter the weekly folder and click on the Discussions folder.
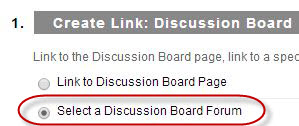
Now it is time to create a Discussion Link. Move the cursor over Tools and left-click on Discussion Board.

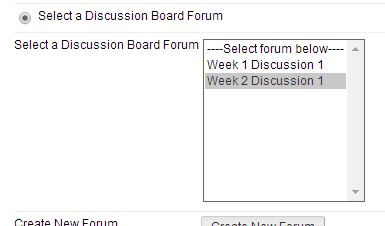
With a Discussion Thread already created, the list of threads should appear under the selection menu on the screen. Click on the small circle next to Select a Discussion Board Forum. Choose the Discussion Thread from the list.
|
|
Click the Next button to proceed to the next page.

Remember the HTML code you copied and pasted into Notepad? Now is the time to grab it. Click on the HTML tool on the tool bar. Copy and paste the HTML code from Notepad into the HTML window.
Click the Update button to apply the content to the Text box.
Scroll down the page a little and make sure the Discussion Link will be available for students to see.
Click the Submit button. That is all there is too it!

Next Steps
When you are ready, continue to Section 9.3 Chapter 9 Activities.
