5.3 Using Application Sharing
The Application Sharing function in Collaborate allows you to share your computer screen with participants in the room. This function is particularly useful if you want to demonstrate something to your students, such as how to use a piece of software.
Besides sharing your screen, you can also give participants permission to use the applications you choose to share, all on your computer! So, if you are demonstrating how to perform a task in a piece of software, you can then give your student permission to mimic the task while you watch.
Besides sharing your screen, you can also give participants permission to use the applications you choose to share, all on your computer! So, if you are demonstrating how to perform a task in a piece of software, you can then give your student permission to mimic the task while you watch.
How to Share Your Screen
- From your start menu, open the application you would like to share. For this example, we will use Microsoft Word.
- Resize the Microsoft Word window so it only takes up about ½ of your computer screen. Position the window on the right side of your computer screen. We do this because the Collaborate menu will appear on the left side of your computer screen once you enter Application Sharing mode. You will need to see this menu while you are sharing your screen.
- In Collaborate, click the Application Sharing icon. Or go to Tools>Application Sharing.

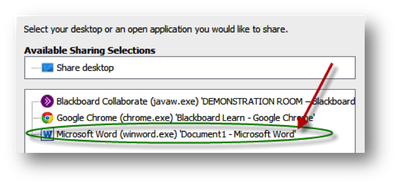
4. Choose the application you would like to share with the room's participants. For our example, that application is “Microsoft Word.”
Best Practice Tip: Do not share your entire Desktop! This takes a huge amount of bandwidth, and may not load on your participants' screens, especially if they are using slower Internet connections.
Best Practice Tip: Do not share your entire Desktop! This takes a huge amount of bandwidth, and may not load on your participants' screens, especially if they are using slower Internet connections.
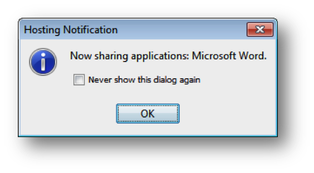
5. A popup announcing you are now sharing your chosen application will appear. Click OK.
You are now sharing your screen with the participants in your Collaborate room. For privacy reasons, if you drag something in front of the application window you are sharing, Collaborate will hide it with a big grey box on the participants' screens. So, make sure nothing is in front of the application you intend to share.
How to Allow Participants to Control Applications on Your Computer
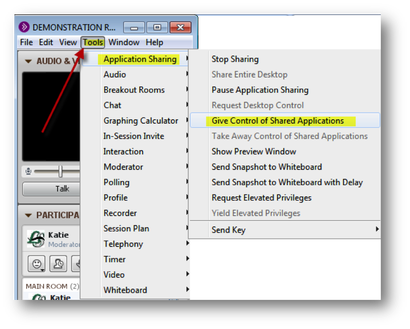
To give control of your shared application to a participant in the room, first click the name of the person with whom you would like to give control, then go to Tools>Application Sharing>Give Control of Shared Applications.
Now, take your hands off of your ekyboard and mouse, and let your participant take control of the shared application.
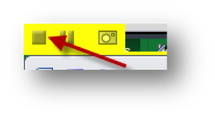
To stop sharing, click the Stop button at the top-right corner of the window of the shared application. Most of the time, this icon is dark yellow.
To stop sharing, click the Stop button at the top-right corner of the window of the shared application. Most of the time, this icon is dark yellow.
Next Step
When you are ready, please proceed to Section 5.4 Using the Web Tour
